 ®
®LEMAX Collectibles
Hints and Tips
For your village scene. All contributions welcome.Lemax products can be viewed at Christmas Every Day
![]()
Click on the Facebook Logo to go to our facebook page for images of our customers villages. Add pictures of yours!
Animation
Any movement or hint of movement can add that "something" to your village. This may be
simply done by adding an electic train to your village. Provided this is done using a
tunnel to hide the train from view at some point in it's travel, the effect can be amazing.
There are also many other ways to induce movement, small electric/battery
motors can be mounted below the base board, above a fisherman can cast his
line, an axe man can cut logs, a painter can paint a wall.....Simply moving
a figurine left and right by having the shaft of the motor glued to the base
of the figure will give the impression of life in the village. More intricate
animation can involve boats moving on their anchors in the breeze to cars
moving on roads, it's up to your imagination and your ability to see a small
motor or gear and think of an alternate used for your village. See an example
at the bottom of this page.
Landscaping your village
Model Railroaders have been using polystyrene for years and it is possibly
the best and quickest way to get your basic shapes formed. Available from
hardwares and specialist hobby shops and sold by small sheet sizes, you can
cut it, form it and glue it quickly and easily. But beware, some glues will
react with it and cutting thick stock can be slow, not to mention the mess.
A hot melt glue gun or a specialty glue is recommended, and cutting /shaping
can be made much easier with a hot knife cutter.
If you are using "water" we suggest covering your base board with polystyrene
except for the water area. This gives your layout a three dimensional effect.
The polystyrene may be only 12 or 19mm (1/2 to 3/4") but the effect of rises
and falls on your landscape will be rewarding. these undulations can be made
with a file, saw or blade dragged over the surface. Don't be afaid to dig
in...you can always re fill the area by gluing more polystyrene back in. To
get the mountain effect just create the height you require by gluing layers
or making box sections with the poly. Once the desired shapes are made cover
with either newspaper and water/PVA glue mix or use a commercially available
plaster material which just requires wetting. Paint and apply ageing effect
to the rocks, apply grasses and trees and your village will be more lifelike.
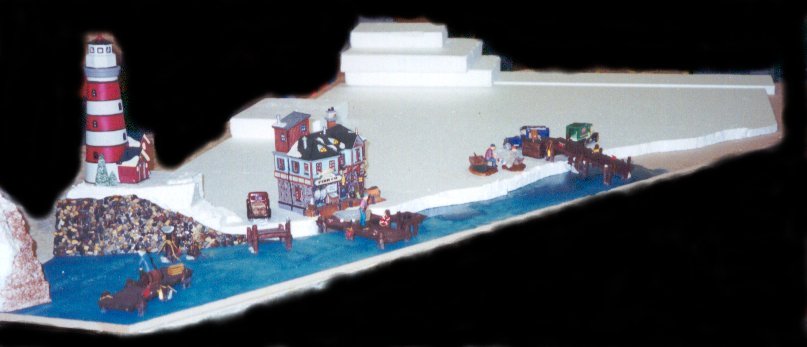
I will be adding step by step photos of my shop display as it was being made.
This was an unusual shape, just 250mm (10") at one end and 1400mm (55") at
the other over a length of 2400mm (8'). The shape was determined by the building
but is a good example of the steps shown in the articles below.
Feel free to use any ideas shown below with my compliments!
The layout is on 12mm MDF(craftwood) to which a 25mm (1") layer of Polystyrene
has been glued. This allows natural water levels and depressions in the land
surface to be formed. Buildings and proposed mountains are placed to guide
the next step.
Bottom left hand corner, almost finished viewof the scene above taken from
the front left corner.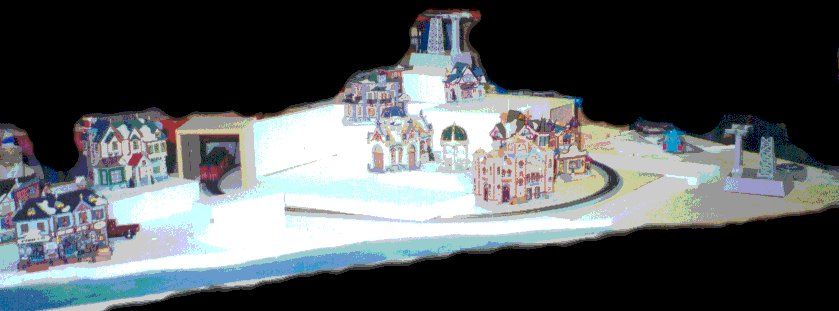
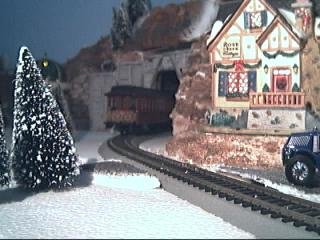
Here more buildings have been placed and the mountain and tunnel for the train
have been laid out. To the right will be the Ski Gondola, the train will dissappear
(important) from sight through two tunnel portals.The section in the center
of the train tracks will be raised on platforms and a road added.

The different levels have been added to create the town center. The proposed road up the hillside is now visible as it winds left and then right. The flat platforms are for the buildings, holes have already been drilled to allow lighting to be supplied. The main street will pass over the rail line and down to the Marine Village.
The portal is made from balsa sheet and scrap.
This is the same view of the train entering the tunnel as shown above at an earlier stage.
A railway crossing will be made here when the track is ballasted.
Early days still, but the display has been mounted into it's odd shaped corner.
Note buildings and boats etc placed here to guage spacings and view. Still a lot of finishing required.
This is to the left of the "Grand Junction Station" showing the yet unfinished polystyrene base with the raised platforms for the "St Gabriels Church" and "Rose Cottage", further up the hill in the background is "Holiday Home". There is a road from the right of "St Gabriels" winding up past "Holiday Home" to the peak where "Misty Valley Resort" and the "Chair Lift" operate from. Wiring for the lamps and the building lighting has been recessed into the foam before the grasses and general scene detail has been done.
Next photos will show the grasses, trees and figurines being placed,
road completed and finish work to be done on the top level.
Grasses are being added, rail track yet to be ballasted. Same view as above.
Rocks on the foreshore being placed, some areas still to be done
More Tips
Retaining walls and sea walls can be made from the foam used as an expansion joint in building construction. this material has a peel off cover exposing a very adhesive surface, simply apply whatever material you prefer to imitate rocks (aquarium stones are ideal), slate, boulders or brick to this surface. Fill between the stones with a grout of a similar colour (or contrasting colour) and you have a very quick wall in whatever size you require. This method also works for paths, roads etc.
Not really a landscaping tip but..weathering effects to cars, trains or buildings can be obtained using chalks and brushes, an excellent guide to this is Model Train magazines.
More on weathering, appling a diluted mix of Indian Ink and Alcohol to timber and such will give that aged look that can "Make" a display. Like everything you need to experiment, starting off with a weak mix until you get the required effect. Paints used for ceramics are also a good source of creating that used and weathered look.
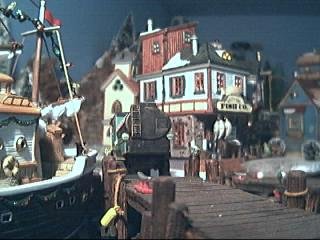
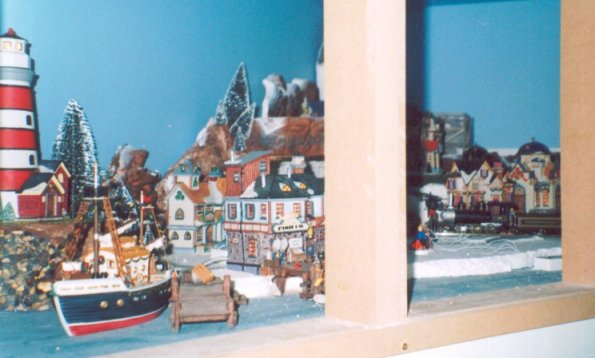
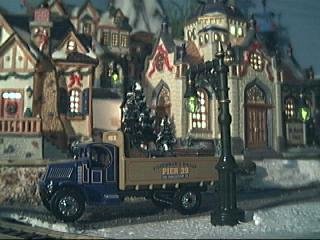
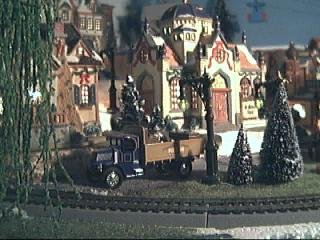
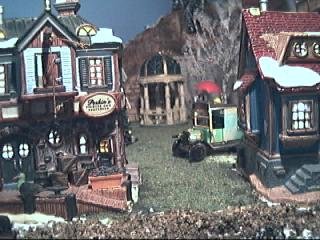
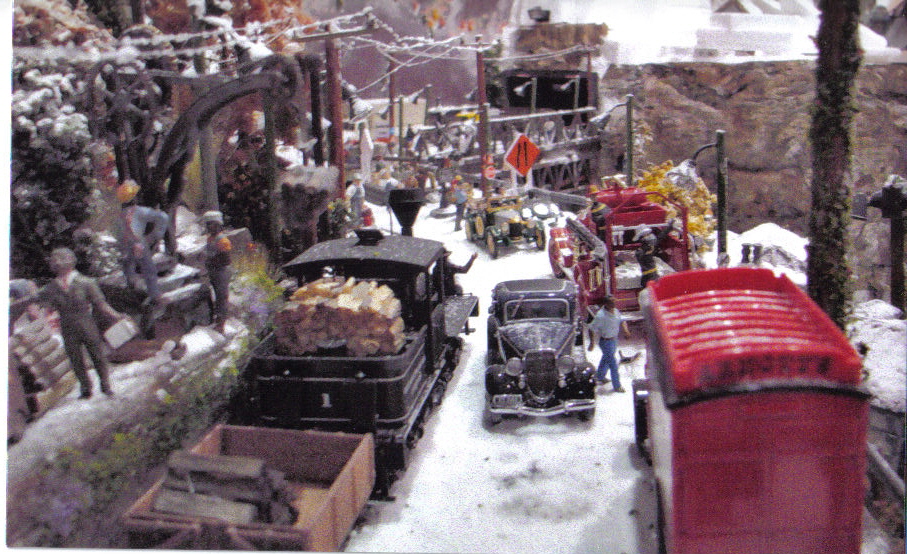
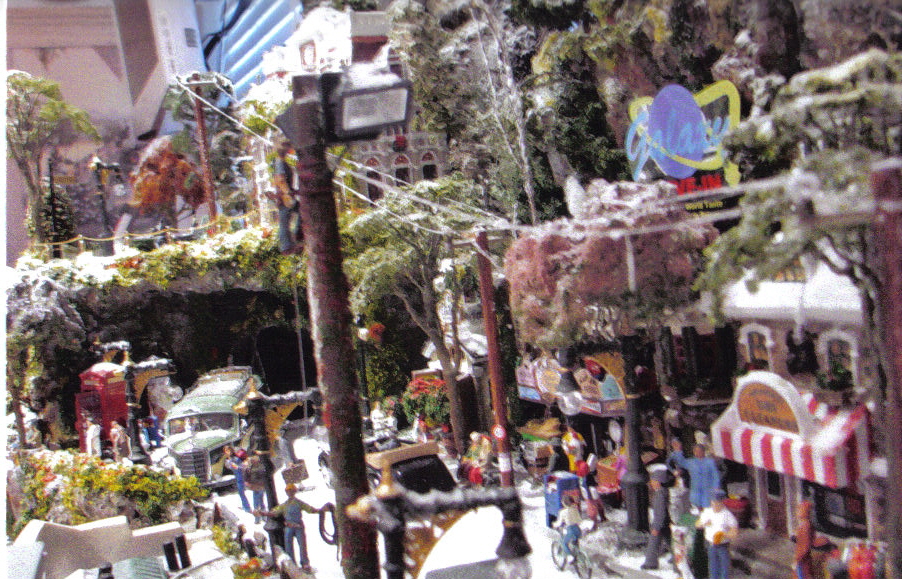
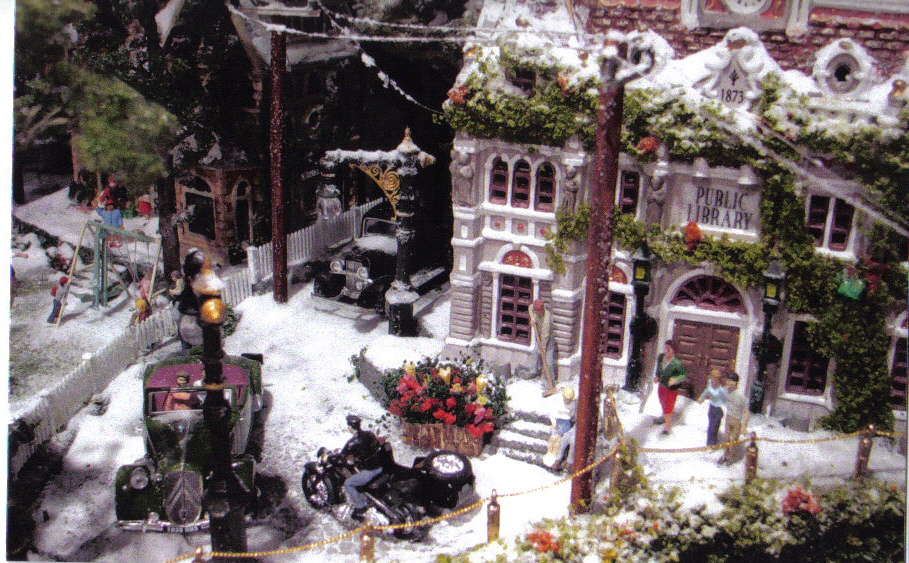
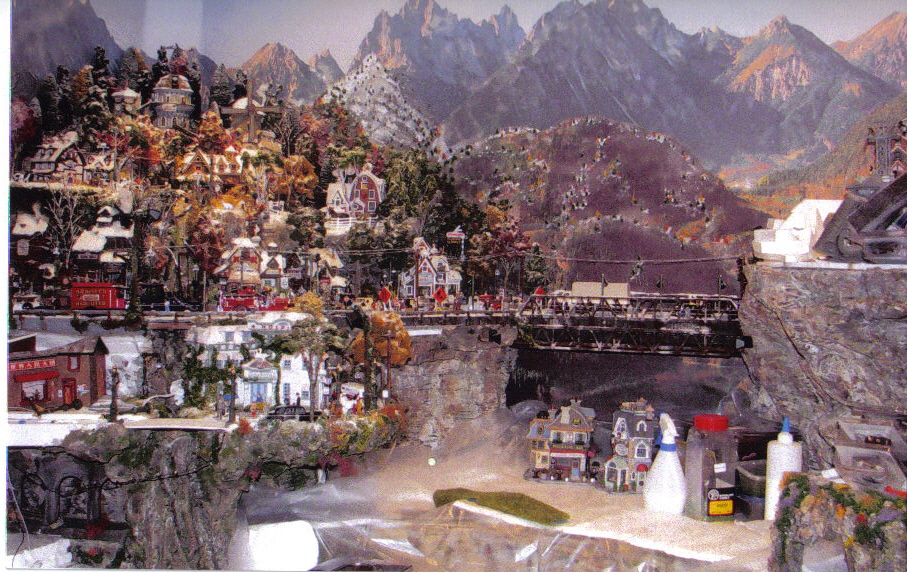
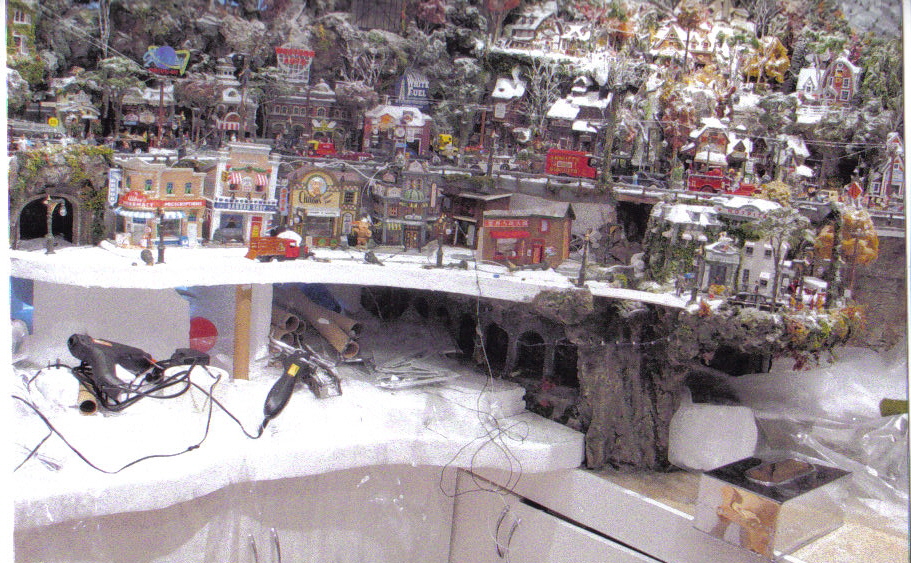
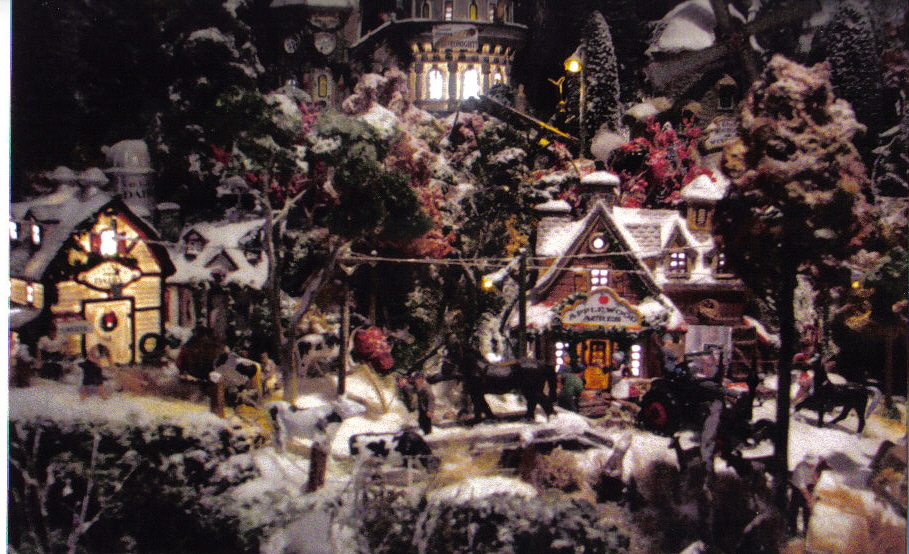
Lemax Village and On30 Model Trains
The following six images are from one of our talented village modellers. Please study the detail and I am sure you will agree it is something special. And it's not finished yet!
Congratulations Clive and thanks for sharing your village.
Lighting
Black light or ultraviolet lights. Combined with flourescent paint applied to buildings, fences, car headlights etc can make an incredible effect for your village scene. Generaly the ultraviolet lights are tube-type available from Electrical and Hardware stores. There are several sizes depending on the size of display you want it on. try mounting the light above or at the rear of your display. Or make a hill to conceal your light in your display. Caution...the effects on your display is addictive.. ..paint stars on the backdrop, in the night sky........timed daylight to night scenes........
Model trains to suit your village
From Milt Dardis
Model train guage: HO is bigger than "N" guage. The largest guage is "G" gauge
and think of it as Garden Railroad. You build them outside. Our villages are
about 1/64 to 1/48 scale and this is represented by "O" Guage. O guage for
most of us is 3 rail either in O or 027. The 2 rail is American Flyer and
its about 1/64 scale. I strongly recommend you take a look at Lionel or MTH
Mike Train House for you railroad. The MTH railtrack is perfect to build your
villages with a RR train. Why??? The MTH track already has a roadbed and you
can just lay it flat. Use plenty of "S" curves for effectiveness.
Milt Dardis
Huntington Beach CA
From Louis Peres
Perhaps someone has already answered your query but just in case....
N is the smaller of these two; 1:160 in ratio to the real thing. HO
is a ratio of 1:87 to the real thing. Larger than this is the S and O
scales, with G scale the largest of all. Ho and N are the most
popular and you can find more accessories for them. Hope this helps!
I'm HO scale myself and my current spring/summer village has 4 HO
train sets. But for use with Lemax or D56 house, I have to use larger
size accesories.
Happy villaging.
Smoke and Sound with trains
With regards to "Smoke and sound" beware! If you note a lot of "New" model trains that are coming out do not feature smoke. The reason is that the smoke is little more than burnt oils either through adding oil (smoke liquid) or pellets (similar) it looks great but what goes up must come down, If you have any snow etc on your village it must eventually get grimy. This does not happen immediately but will over time. Just wanted you to be aware of this. As far as sound is concerned "bring it on". You can convert or have converted just about any current model. It is fiddly to do but the effect is fantastic. The new systems pick up a signal off one of the wheels so the sound is realistic and related to the speed of your train. There are many soundtracks to suit diesels and steam models. I don't sell the sound systems but recommend them. If you are going Hi-Tech the new DCC digital systems may appeal but they are aimed at the train buff who wishes to run a number of trains on one system but control them independantly. These DCC systems allow sound from the engine, a whistle when required, control of illumination etc. They are awesome. It will become a standard in the years to come and Bachmann is releasing models now that are DCC ready.
Water Effects
Clear silicone like those used to seal bathroom basins and showers etc can also be used to imitate the ocean waves and ponds. This can be applied directly onto your village base board. Simply apply the colour for your water scene to your base board (use two or three colours to get the effect of different depths) and place beads of silicone clear caulking in rows to represent waves. Experiment with the distance apart to get the effect you are after. You can shape the waves using a flat stick...it pays to experiment with the effects. On the shore line place some PVA glue and sprinkle sand and you will have instant beach....don't forget the driftwood washed up on shore. If a pond or river scene get some aquarium stones which are available in a good range of colours and use these on the edge of the silicone and up the river bank.
Woodland Scenics also make a product called "Realistic Water" which we will have available. It is a simple pour on product with no messy chemicals or odour. There is also a product called "Water Effects" for water falls etc.
Waterfalls
The following items will be needed: Woodland Scenics Realistic Water Acrylic Craft Paint (Dark Colors) Woodland Scenics Water Effects Woodland Scenics Turf Flocking (Mixed Colors) Styrofoam Board (Pink Board) Razor Knife or Hot wire Woodland Scenics Spray Cement Hot Glue Gun Water Mister Bottle Sharpie Magic Marker Masking Tape Disposable Paint BrushI start out by taking a section of styrofoam board as my base and gluing upright sections with a glue gun to it. These will form the shape on an "L". Several of these sections will be glued together to form my mountain base. I then take a razor knife and cut off the edges to shape them into curved ridges of the mountain. I use a magic marker to draw out the outline of the river and waterfall. Being careful not to cut all the way through, I use a razor knife or hot wire to cut out where the river will be flowing. This does not have to be a smooth cut and can have bumps and ridges in it. At this point I am ready to do my landscaping. Using a water mister bottle, I spray the Spray Cement on the entire display with the exception of where the water is to go. Using various colors, I now sprinkle different colors of turf flocking onto the wet cement. Wait until this is completely dry. Now spray with the cement again and flock again. Remember, Nature does not have any set patterns of fixed colors, mix your colors at random. Wait for this to completely dry. If you do not wait for it to dry, the sprayer will move the turf around to where you do not want it. After this has completely dried a second time I spray it again to seal every thing in place. I am now ready to work on the water. I take the dark acrylic paints and paint the streambed, with black being in the middle. The darker it is painted the deeper it will look. Using masking tape, cover the 2 ends where the river is cut lower than the rest of the display. This will keep the water from flowing off the board. After the paint has dried, we are now ready to pour our water. Starting at the top, I pour a little at a time and let it flow down the river. NEVER pour more than 1/8" at a time. As the water is flowing down the mountain, I also take a paintbrush and pull some of the water up on the sides of the river bed to make it look wet. I wait until this is dry before I make a second pour. I will build up the water level to the desired amount and let the entire river dry for 24 hours before I work on my falls. Using the Water Effects, I start with a bead at the base of the waterfall and pull it up to the top. I continue this until I have the desired look of a waterfall cascading down the mountain. Another way that I like better is to take a Teflon cookie sheet and spread some of the Water Effects out on it the same size that you want your waterfall to be. Now take a toothpick and draw lines in it to look like ripples. When it dries, you can peal it off and lay it on the area that you want your waterfall. The Water Effects will come out white and will take about a week to change to a clear color. If I want any rapids, I will add bumps in the water with the water effects and move it around with my paintbrush. The water effect will also take 24 hours to dry hard.
Written by: Tim Stephenson Pretty Petals http:www.pretty-petals.com 757-357-9136
Plaster Cloth Mountains
Items Needed: Plaster Cloth by Woodland Scenics Masking Tape Cardboard Box or Foamboard Bowl of Water Newspaper Latex Paint - Brown or White Glitter Woodland Scenics Turf - Assorted colors Woodland Scenics Spray Cement Water Mister Bottle
The directions for how to make "Plaster Cloth Mountains" came off of the package of Plaster Cloth by Woodland Scenics. I have added a few helpful hints that I have found to be useful in making mountains. Plaster cloth is a plaster-impregnated cloth, much like the material used for making cast on broken bones. I start off with a design on the height and length that I want my mountain to be. I have found that a large cardboard box or a sheet of foamboard will be the background and the base of my mountain. I cut out a section as to the shape and length of the mountains. This will form a "L" shape when looking at it for the side. I now take newspaper and ball it up; you will need numerous balls of newspaper. I then put the newspaper balls into the "L", working from the backside to the front and the bottom to the top. This is what will shape the mountain. To hold the balls in place, run strips of masking tape over balls and extend to the back of the mountain and under the bottom. When putting the newspaper in place, don't try to keep it smooth. The bumpier the better, the newspaper is what will give your mountain some texture. Once I have shaped up the mountain with newspaper, I am ready to cover it. I take the plaster cloth and cut it into 1-foot sections, for easier handling. I take a section of plaster cloth and dip it into a bowl of water and lay it on the mountain. I start at one end and lay a section at a time, with a 2-inch overlap on the back of the mountain and a 2-inch overlap over each section. This will make it appear as though it is one section covering the entire mountain when it dries. I now put the mountain aside to dry overnight. It is important that you allow the mountain to dry. All of the water that was put on the plaster cloth has now dripped down into the newspaper and we want the newspaper to dry before we paint the mountain or it could mildew. Now that my mountain has dried, I am ready to paint it according to the season that it will be used in. Should I want to use it as a North Pole Mountain, I would paint it with White latex to give a snow effect and before the paint dries, I would sprinkle glitter in the wet paint so that my paint acts as glue as well. Once dried, my mountain will have a North Pole glitter effect. Should I want to use my mountain for other seasons, I will paint with brown latex. This will give the effect of dirt when I am finished. While the paint is still wet, I sprinkle the entire mountain with various colors of Woodland Scenics Turf. I do not use any set patterns of color, just sprinkle it at random as nature would do. The wet paint will act as glue for the turf when it dries. Once the paint has dried I take a mister bottle and spray the entire mountain with Woodland Scenics Spray Cement. The spray cement will seal the turf in place and allow you to dust off your mountain with out pulling up the turf. I can now decorate my mountain with bushes and trees and any other items that I want to have on the mountain. A roll of plaster cloth will cover 10 square feet and comes in a roll 8 inches wide by 15 feet long.
This tip was written by Tim Stephenson of Pretty Petals and may be reproduced for your use. Tim Stephenson Pretty Petals 303 Jefferson Drive Smithfield, Va. 23430 757-357-9136 www.pretty-petals.com Pretty@visi.net
Animation
If you live in the USA you are blessed with a great on line store in your
back yard in Micromark ( www.micromark.com ). Their catalogue and web site
have a 110 volt gearmotor perfect for animating. The number is 82090 and is
$9.95 last time I looked. It is only 2" diameter and 1" long.
Here is how I do it:
Glue a bolt or shaft under the base of eg; Lemax Fly Fishing figurine. Put
this through your display base so that the threaded bolt protrudes through
by about an inch. By using two nuts lock a circle or lever to the bolt and
fix two smaller bolts to the outside circumference and one in about1/2" from
the outside edge. This is hard to describe but you then have a figurine fixed
to a shaft passing through the display base, at the bottom of this shaft is
a disc or lever with a small bolt fitted to the end. The second bolt is attached
to a rubber band (elastic band) and becomes the "return spring". At this point
what is required to make it "animate" is to use the newly purchased motor
after fitting a similar disc and trip bolt. By mounting the motor in such
a way that the two discs overlap and the two "trip bolts" come into contact
with each other with every revolution of the motor. Now when the motor is
run the motor disc revolves and makes contact with the trip bolt on the figurine
disc, as the two discs move the rubber band stretches and when the motor disc
looses contact with the figurine disc, the rubber band returns the figurine
to the original position.
So in practice the fly fisherman slowly moves back in his swing and then suddenly
springs back to his original postion ( casts his rod). Hey Presto! Movement!
This is difficult to explain so if you are still not sure please ask me to
fill in the grey areas. This type of small movement adds life to your scene,
it is not an attention grabber but will delight those who see it in action.
The amount of times he casts is dependant on the diameter of the two discs
(your choice so a bit of experimentation here) and the speed of the motor.
![]()
Click on the Facebook Logo to go to our facebook page.
Back to Christmas Every Day
Email us
